Installation
Please read through this before installing a CCTV system as there is some handy advice.
So you’ve received your order and opened the packaging to ensure that everything is in the box. Before you start drilling holes and running cables it’s worth running a few checks.
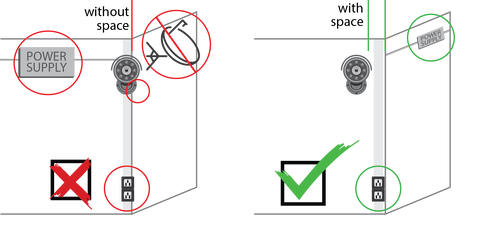
Firstly check where you want your cameras to go. As with most things planning is of upmost importance. Make sure that each area you are looking to install the cameras has plenty of room to work in and that any cables that will be run do not run adjacent to any power lines or anything that gives off a strong magnetic field. RG59 cables are generally quite resistant to electro-magnetic interference but this could still cause lines to appear on the camera footage.
All of the cameras and recording units we sell are tested before they are sent out but unfortunately we are not able to monitor what happens during transit. It’s therefore a good idea just to connect everything up and to make sure it all turns on and that you get a picture on all the channels. This also helps save time if there is a problem with any of the cables, running cables is the most time consuming part so you will want to ensure everything works before the cables are run. Whilst you have everything together also make a note of all the serial numbers. Should any problems develop with a camera a serial number will need to be provided and it is easier reading from a piece of paper rather than looking at a camera label upside down whilst standing on top of a ladder.

Once you are happy that everything is working and that you know where you will be installing the cameras then you will need to run the cables. Running the cables is the most time consuming part and care should be taken not to cut the cables or bend the cables back on to themselves to avoid damaging them. We recommend manually tacking the cables with cable clips as some staple guns can damage the cables.
To install dome cameras you will need to unscrew the base first. You can then put the base into position and drill the holes to attach it to the wall. Run the cable through the base first before securing it to the wall. The cable can then be connected to the camera and the camera screwed onto the base. If you are installing a HD-CVI unit then there will be two connections, one for power and the other for video. IP cameras will have just the one connector as both power and video will be sent down the one cable. The camera itself can be rotated in any direction before being tightened to the base. Bullet cameras are slightly different as they do not have detachable bases. Simply position where you want the cameras, mark where the holes are and drill the holes.

All the cables should run back to the DVR or NVR. Once all the cameras are installed it should just be a case of connecting the cables to the DVR and power source or just the NVR. If you are installing a 32 Channel NVR you will need an extra POE switch as our units only have 16 channels with POE. Once the cameras are connected they will be picked up by the DVR or NVR straight away.


